John's Flute Page
Flute Pictures & Comments
Modern Flutes
Basics
Quality
The cost of a flute depends on the material of which it is made, which can be a brass like alloy (cheap) or a precious metal, silver, gold or even platinum. Silver plating is usual for low priced flutes, nickel is less satisfactory, but, strangely, often produces a better sound. Having been out of fashion for fifty years or so, wood is making a come back. The material does affect the sound but the primary influence is the quality of design and construction. It is not possible to have a bad flute retuned (but see the note on the position of the head cork, below).
The mechanical design and fitting of the parts of a flute is crucial to the way it plays and the length of service it will give. Some faults can be corrected by a good technician but there is no substitute for original precision. The seal and action of the pads has to be perfect if the instrument is to play properly.
You may like to consider the differences between the thumb keys shown disassembled further down this page. They are both from one of the best makers. The lower one is made of solid silver (throughout) and the quality of construction is of the appropriate extra high standard. Look at the concentricity of the mark where the pad meets the flute and the rim of the cup and fixing screw. Not all the 500% extra cost is in the value of the metal, and the cheaper one is a 'step up' model with a solid silver head joint.
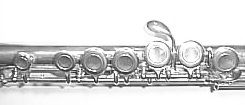
This student flute has the standard features of
- Offset G. The pair of key cups out of line with the others.
- Split E mechanism. The offset cups can move separately, the lower one can close without the upper one, but not the other way round. This makes top E natural easier, but there are drawbacks.
- Covered action. There are no holes in the keys. Finger placement is not critical.

This handmade, professional flute has the usual lack of 'frills'. Sometimes described as 'Conservatoire', this model has become the preferred tool of the dedicated player.
- Inline G. All the key cups are in line.
- The two cups moved by the left hand third finger are inseparably linked together.
- Open action. There are large holes in the keys. Finger placement is critical.
- 'Pointed' key cups. An ornamental and stiffening ridge linking the cups that are not touched by the fingers to the axle line. This is a usual feature of hand made and better quality instruments.
The Foot - Low B
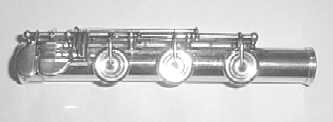
A foot joint to low B natural (a note lower than the standard C natural) is a nice luxury. The B natural is only rarely written and not easy to produce, especially in a hurry. There are some advantages though, you may like the effect it has on the top octave. This is an expensive variation of the standard instrument, not at all necessary, especially for a novice. If you are contemplating buying one as an accessory there are hidden pitfalls. Take great care, it could wreck your D's, D#'s, every note lower down, and a few very high notes into the bargain. Check the length to the C# hole, it might be significantly different from your original foot joint. If it is, it will affect your intonation. Some length variation may be compensated by different hole sizes. Be sure to try the entire compass of your instrument.
Curved or U-Bend head.
This feature, previously only found on the rare very large sizes of flute is now available on student models. The idea is that it enables small people (ie. children) to play a flute without adopting bad posture habits. If you have short arms it is almost impossible to hold a standard flute nearly horizontal. The U-bend brings your hands very close to the mouth and enables you to stand straight and proud when you play. In this respect it is a very good thing. However, I have misgivings about the suitability of the flute for anyone who is so small that a curved head flute is a necessity. Such persons are generally rather too young, in my opinion, to cope with the other very physical demands of flute playing. Musical skills can be learned through any instrument and one that makes more appropriate demands might be a better choice. The piccolo is not an easy option, they are very hard to make sound nice. (The Yamaha YRF 21 is easier and a viable alternative as long as experienced flute player is available to guide the young novice.) Recorders have a similar repertoire and technique to the flute and are ideal. I do not think that waiting to start on a flute until one is big enough is a bar to progress. Rather the opposite actually.
If you have a U-Bend head for your flute I suggest that you assemble it as shown here .
Notes of Mechanism
Split E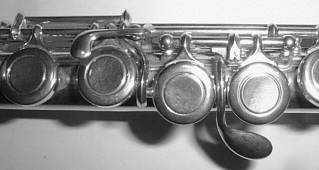
The name of this 'gadget' gives rise to misunderstanding. The 'split' cups are responsible for G, for which they must close together. However, the purpose of splitting them is to improve top E natural. The lower of the two cups is linked so that it goes down with the of the right hand middle finger cup (5). (But not the other way round.) The effect of this is that top E natural, fingered Th 12_ 45_ D# has only one vent hole open in the middle of the sounding part of the instrument. This is advantageous for ease and security of tone production and brings a slightly difficult note into line with top D#, F natural and G. It has become an almost essential feature of student flutes. Unfortunately, life for the flute player is not that simple! It does nothing for top F#! Top F# is a bane! Not only does it have two open vent holes, it has an undesirable closed hole below the sounding part of the instrument. This is a 'double whammy'. Given the popularity of sharp keys in flute music, top F# can become something of a bugbear.
Unless you are carefully trained to use your lip and ear to focus on high notes properly, F# is a real problem. I found, when I was teaching, and had to take on a couple of pupils with the new model Yamaha student flute that featured split E, that their high note problems were solved by its removal. My reasoning was that one unusually 'good' note next to one of the worst notes on the instrument was a recipe for disaster. By making the notes more equal in tone and 'resistance' their problem passages were much more easily dealt with. The link was easily removed, and could almost as easily be replaced as it was a simple screw fitment (no longer the case), but they never wanted to have it back.
There are, admittedly, times (Dvorak 8th Symphony) when it can be useful, but there are other ways of dealing with top E natural problems. Split E kills the standard fingering for top G/A trill. Again, there is a way round, but it is not so good. My teacher had a flute with a little draw bolt on top of the second G cup. With foresight it could be set in the most appropriate position. He always had it disengaged.
The 'clutch' linking the two cups is particularly prone to disarrangement and correcting it is the most frequent of all the repair jobs that I have to do.
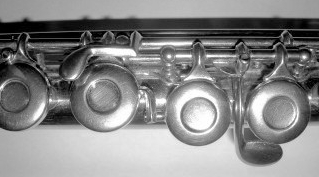
The image above is of an alternative mechanism fitted to some Gemeinhardt student flutes. The lower of the two G cups is linked to the cup covering next hole down the flute. This has the right effect on the high E but has a detrimental effect on the the two lower B flats. Particularly the second octave B flat, which becomes flat and unfocused. It contradicts Boehm's design principle of only closing the holes that are essential in forming the pitch of the note needed. Having two 'spare' holes closed for the fingered B flat is quite bad enough. Closing a third is a serious error. If you have one of these flutes you can judge the extent of the bad effects of the link by pressing the G sharp key while playing B flat using the right hand first finger. I suggest that you should get the link disabled by bending the parts away from each other or having one cut off.
The original Boehm flute design had only one thumb key, the one we all use for B natural. The second lever, that connects to the main line of mechanism and holes and gives B flat with just the thumb and the first finger, is the invention of an Italian virtuoso named Briccialdi. This 'Briccialdi Lever' is the only significant addition the Boehm's original design that has stood the test of time. It is a real boon, as any one who has tackled Briccialdi's variations on 'The Carnival of Venice' will testify.
There are some problems in its use, but knowledge provides the complete answer. The usefulness of the key lies in the way it sets up the flute for playing in 'flat' keys. In use the extra key should be 'trapped' by the thumb (touching both thumb keys at the same time). It should not be used for an isolated B flat. For those you should use the first finger of the right hand, perhaps on the extra lever.
It is obvious that one should not be pressing any sort of 'B flat key' when trying to play a B natural, but that is not the end of the story. Top F sharp can be produced by blowing a harmonic of B natural. If the Briccialdi lever is pressed the fundamental becomes B flat, and the harmonic is top F natural. Now, consider the standard fingering for top F sharp. With the left hand second finger up, there are two holes open under the left hand if the B natural thumb key is pressed (the correct fingering) but only one if the Briccialdi lever is pressed and the resulting note is very flat. It is as though the flute, unable to decide whether the player want an F sharp or an F natural, decides the hedge its bets and produce the note in between them!
'So what?' you may ask. Beware! Do not forget top G flat, especially in minor keys. Be prepared and get off the Briccialdi lever in good time. There is another side to this coin too. A sharp. In general, it is not a good idea to use the Briccialdi lever to produce A sharp. This leads all too easily to a fistful of wrong notes, especially when sight reading. However, with knowledge and preparation you can mark up your part and turn some difficult passages into sequences that are merely 'tricky'.
There is a trend, doubtless a cost saving measure, for modern makers to fit Briccialdi levers without a spring. I have had several instruments brought to me by players (and teachers!) who thought the failure of a Briccialdi lever to spring back of its own accord was a fault and the flute needed repair. You can see from the image below (the thumb keys of a Yamaha YFL 311) there never was any second spring. There are no problems associated with this construction. The Briccialdi lever moves with the B natural thumb key, or the B flat cup on the main line. It may rattle about and I must admit that having always played old flutes I don't like the way the springless ones 'fidget', but any wrong notes are my fault and not the result of a broken instrument. A really good instrument technician could fit a spring for you.
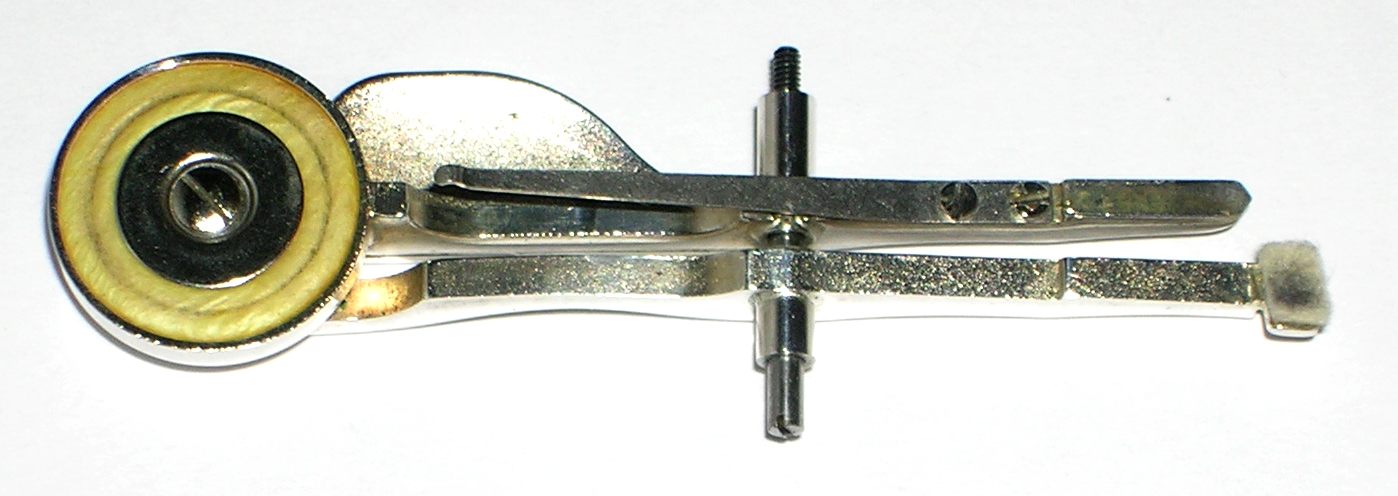
Springless Briccialdi lever (YFL311). Click here for a really big picture.
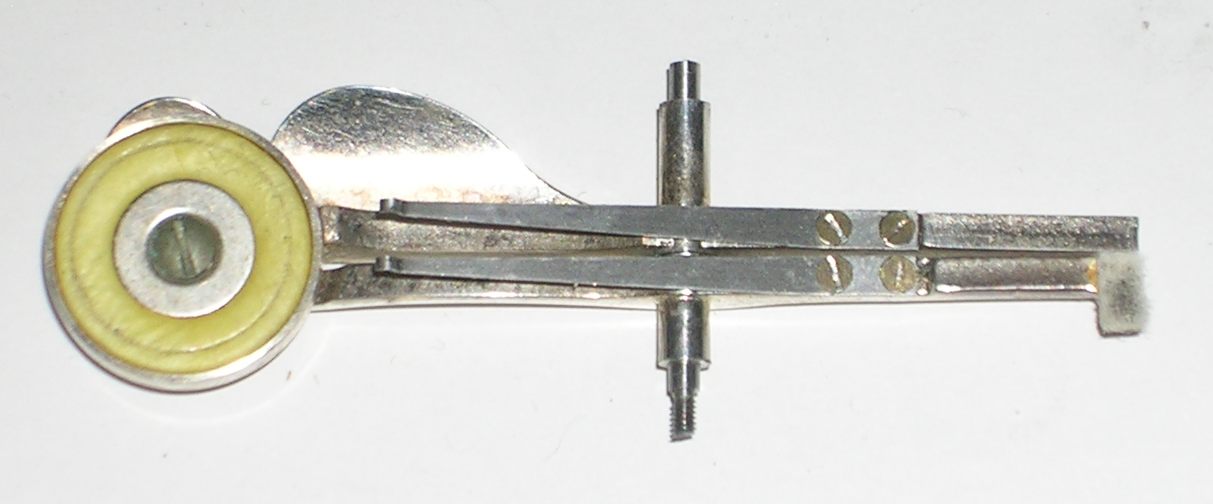
Briccialdi lever with spring (YFL681). Click here for a really big picture.
On most modern flutes the Briccialdi mechanism is the only connection between the thumb keys and the main line of keys but there have been other linkages. A link between the B natural key and the Right Hand first finger extra touch piece was standard on English flutes and many continental flutes until the mid C20. Some flutes even had it in addition to the now standard Bb/A# extra touch piece. Its function was to facilitate the B/C trill. I prefer the Bb/A# touch which facilitates legato playing, even though I grew up with the B/C trill.
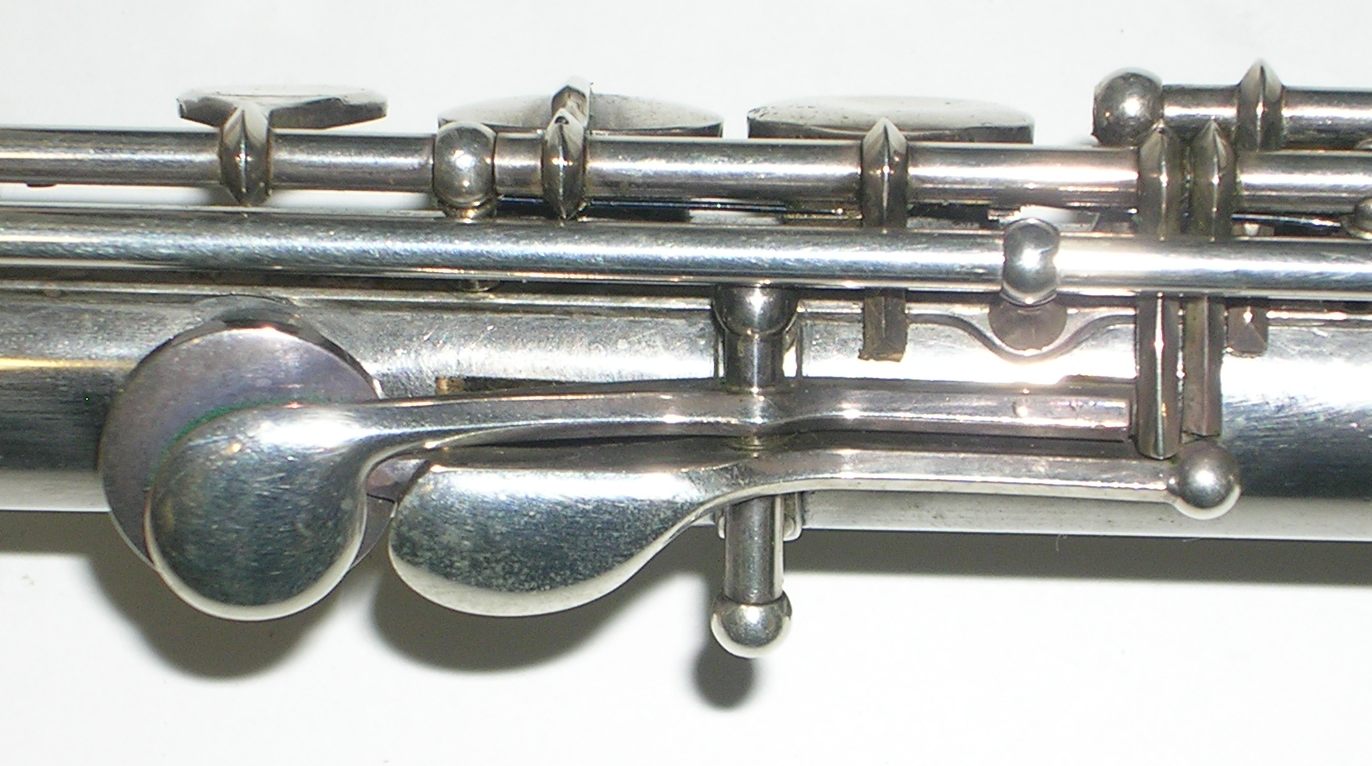
On this old (c.1930) Rudall Carte flute the B natural key
is linked to the Right Hand extra touch piece,
which is a B natural trill key.
You can just see that the Briccialdi lever has a spring.
Click here for a really big picture.
Inline Mechanism
Until I got a flute made this way I was extremely sceptical. I had always played on covered action, offset G, between the wars wooden flutes made by Rudall Carte. There were none better, and most British players used them. In the late 50's there was something of a revolution in flute playing in Britain and the new 'French' style became the rage. Silver flutes became the norm, together with inline mechanism and, what's more, open action. The two always go together.
I am a convert! I like the directness of the key action, the need for clean and precise finger placement improved my technique, and I fancy that I hear my instrument better. There is no gain without pain though. It was quite a shock to the system after over forty years. I was told that the only thing to do was to lock my old flutes away, banish them like old flames, and concentrate on the new love of my life.
You can plug the holes as a temporary measure, perhaps just one or two, but it is best to take the plunge and eschew plugs completely. There is the 'halfway house' of offset G with open action. It doesn't appeal to me but there is a lot to be said for it. On a mass produced instrument I think the action may be more reliable.
The Stopper in a Flute Head
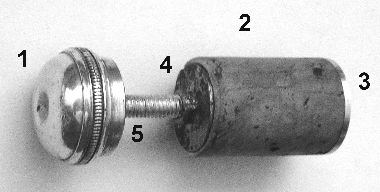
The stopper or 'head cork' of a standard metal 'Boehm' flute.
Wooden and 'Folk' flutes are made differently.
The performance of the flute is critically dependent on this simple assembly. For the best results all the following points must be correct.
- The 'crown'.
- The cork, usually natural but there are synthetic alternatives.
- The front plate.
- The back plate.
- The threaded rod. (This is permanently fixed to the front plate.)
Problem Solving
- The cork must be held tightly between the plates.
- The cork must be a tight fit in the head joint.
- The face of the front plate must be the right distance from the mouth hole.
Warning!
from the top end of the head joint.
Only in a very few flutes is this possible.
You are most unlikely to meet one of these instruments.
The flute head is slightly tapered towards the top end
and the plates are a near fit to the tube
when the stopper is in the right position.
If you push the stopper too far up,
the front plate will jam in the tube.
A lot of force will raise a ring around the head.
This is an irreversible scar that will haunt you for ever.
The stopper should be a tight fit in the head. It can be moved by pushing from either end. Screwing up the crown too tight will pull the stopper out of position.
Do not use your cleaning rod to move the stopper.
To move the stopper down, working from the top end, after removing the crown, you will need a special tool. A short length of thick wall metal tubing that will fit over any nut like device attached to the back plate. I found a nice piece of chrome plated brass tubing, just the right size, in the gutter. In a previous life it had been a car radio aerial.
To move the stopper up you will need a piece of dowel. It is useful to have a position line marked on it, 17.5mm from one end.
In many cases the stopper can be moved small amounts by turning the crown and pushing and pulling. However this all too often leads to problems and a poorly performing flute.
Caused by voids in the cork assembly.
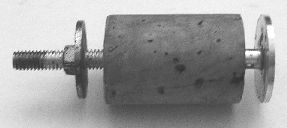
Remove the crown, and then the stopper assembly. (Down the flute.) Screw the front plate and then the back plate onto the cork, firmly. You may like to glue the front plate onto the cork. It will prevent the plates loosening again. The threaded rod is sometimes not threaded for its entire length (as in the Yamaha example illustrated). If the cork is not tightly fixed when the back plate will move no further you need a new (longer) cork. The problem may be solved by putting packing between the back plate and the cork. Use a slice of bottle cork, it does not have to be a good fit, though that would be nice!
Caused by an incorrect stopper position.
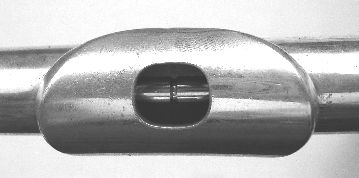
For a Boehm flute the front plate should be about 17.5mm from a the middle of the mouth hole. You should be able to judge this with your flute cleaning rod. (Preferably the one supplied with your flute.) There is usually an incised line round the rod at the other end from the 'eye'. When the end of the rod is against the plate this line should be visible half way down the mouth hole. It is important to check for voids before you spend time on this. If there is a rattle from the head when you shake it or gently tap it against your hand there is certainly a loose back plate and the stopper assembly must be attended to first.
When the stopper is too far back the harmonic notes tend to be too close together, in simple terms, the octaves are narrow. They become wide if the stopper is too far forward. Because of the different ways the third octave notes are produced this is a very difficult adjustment for a beginner to make satisfactorily by ear. Experienced (really professional) players have preferences for slightly different positions and the technique to justify them. The situation is further complicated by the position of the head in relation to the body (pushed in or pulled out).
The classic stopper position is for it to be back from the centre line of the mouth hole by the internal diameter of the tube at the mouth hole. You can check this by putting the marked end of your cleaning rod into the mouth hole and looking down the tube to see where the line comes. Flute rods are made with rounded ends so that you get a true picture of the relationship between the mark and the size of the tube.
This is not in itself actually very important, the crown is hardly ever fixed.
The stopper is probably not a tight enough fit in the head. Remedy this by tightening the plates or replacing the cork. The crown should be screwed up to the head just enough to hold it firm. If you work hard at it you will draw the stopper out of its best position. If you undo the crown, and then push it back, you will move the stopper back down the flute.
Particularly in 'school' flutes, stopper problems arise like this...
The crown is turned clockwise until it will move no more. There are two stages of effect. The first pulls the cork up too far and the second loosens the grip the plates have on the cork. (The cork and back plate get wound up the screwed rod towards the crown.)
An attempt to get things working properly usually involves unscrewing the crown and pushing the stopper back down the flute. This is only effective if the plates are still hard against the cork (they rarely are).
When the front plate is not hard against the cork, everything looks satisfactory when checked with a flute rod, after pushing the stopper back with the crown, but the flute won't play properly. Sometimes, even more confusing, the flute won't play properly at the start, but, later, suddenly does. That is when the void behind the front plate gets filled with water. Any void behind the front plate will upset things, particularly in the third octave.
The Joints
- Tight Joints.
It is important that you do not put any grease or other lubricant on the metal to metal joints of modern flutes. They are fittings, not bearings.
The problem with grease is that it tends to pick up particles of dirt that get embedded in the metal making the joint difficult to fit and separate.
The joint surfaces inside and out should be wiped clean and dry when ever the flute is put away. (After every playing session.)
If you are having trouble with a tight joint that jams you must clean it thoroughly.You need a solvent on a tissue, or piece of cloth. Alcohol (meths), acetone (not nail varnish remover, it has a small amount of oil added) or 'Zoff' or similar solvent for removing the residue of old fashioned sticky plasters. The inside and outside parts both need to be thoroughly cleaned. If there are black marks left on either surface the joint will not mate smoothly and the surfaces need polishing. The black marks are hard dirt particles embedded in the soft metal. Polishing with fine steel wool lifts them out and removes any burrs that are left. Be very careful not to abrade the visible plated surfaces. Wipe the joints over again with the solvent afterwards.
- Loose Joints.
Loose joints are the result of careless handling. Take care always to hold the parts in a straight line, with your thumbs pointing in the same direction, as if holding a bat or golf club. If you always do this the open end of the tube will not be rolled over making the joint loose.
Correcting a loose joint is a routine job done with special tools. Do not attempt to fix a joint without them. The kit comprises an expanding mandrel, a stepped mandrel, and a shrinking die.
Construction
There are several ways of making the joints. The socket is usually a separate piece of tube but it can be expanded from the main tube. I do not think there is much to choose between them but the best instruments are always made with a separate tube.
The Pads
Flute pads vary from one make and model to another but many current instruments are Yamaha clones and a set of Yamaha style pads will often do. Quite apart from the three small pads, most modern production has three different sizes of pad on the body and another on the foot. The thickness, as well as the diameter, is critical. It is a very bad idea to attempt to pad a flute with pads that are too thick and need to be fitted with a wedge of packing under them. Pads that are too thin are easily accommodated by packing washers of card or paper. Always retain any packing when removing old pads and re-use it when fitting the new pads. My preference is for thin pads (packed as necessary) hard, rather than soft, yellow rather than white and of the best quality (double skin). Take care too that the backing of the new pads has a hole large enough to accommodate the stud that accepts the pad retaining screw or (plastic plug). If your flute has thin edged tone holes it may be a good idea to use leather rather than skin pads, but their thickness may be a problem.
Leaking Pads.
- No woodwind instrument will play properly unless every hole can be completely closed by associated the pad.
Flutes are particularly sensitive in this respect.
- The seal between the closed pad and the rim of the tone hole must be perfect.
- For the seal to be perfect these conditions must be met...
- The pad must not have any split in the thin skin covering the felt.
- When a key is depressed, the associated pad(s) must meet the rim of the tone hole(s) evenly, all the way round at the same instant. (If a seal is only obtained by the use of force the instrument will never play well.)
- The rim of the tone hole must not have any dents, splits or cracks.
- The fixing screws and/or washers (where needed) must all be present.
The regulation of pads moving together is set by the small screws near the line of the axle on which the keys pivot. However, there are a few places where the link is adjusted by packing. These are the link between the right hand first finger and the highest large hole in the line (closed for B flat), the link to this key from the 'Briccialdi' (B flat) thumb lever, and between the lowest two keys on the foot joint.
Screws rarely get lost but they can present tricky problems to diagnose. Yamaha screws often lose their plastic 'anti click' insert. It is possible to get new screws from a Yamaha dealer but an effective repair is to fit a wooden replacement insert made from a cocktail stick.
Many older cheap flutes are very difficult to regulate because the end of the adjusting screw is not cut square or rounded. The best style of end is a dome and this is not too difficult to form on a bad screw. (Use a fine file and a small, hand-held 'Expo' type drill to spin the screw.)
There is usually a non-metallic packing piece glued to the lug that is moved by the screw. Sometimes these slide out of position or get lost. Do not use a 'super glue' to re-fix them. I have found that the traditional shellac adhesive is as good as anything. A piece of thermoplastic sheet cut from a bubble package is a good substitute for a lost piece of packing.
The most common problem with leaking pads comes from the 'split E' mechanism. The two pads operated by the left hand third finger get 'out of step. The situation is complicated by the link to the right hand second finger key. In the lower octaves, notes down to G# are fine, G is poor, and F very bad, but F# and the other lower notes play well.
The remedy is usually to turn the regulation screw between the two 'G' key cups. The lower end pushes on a lug that is connected to the lower key. The lug is easily bent and if there is not enough travel on the screw the lug will have to be bent back.